Color Wheel Replacement
original price: 30,00 USD

Trury Lai
Contact person
Basic Information
How do you replace a color wheel? If you ask how to replace a color wheel, it's a sign that you shouldn't bother. Infocus does not sell replacement color wheels to do-it-yourselfers. Cost for authorized-dealer color wheel replacement is comparable to buying a new projector. It's quite a complicated event and requires careful surgery. You almost have to totally disassemble projector to do it. Why do you need to replace the color wheel? The color wheel can be cracked or lose segments. Most likely because the lamp lens which is right next to the color wheel cracks. Most likely because the lamp assembly screen is filled with dust and the lamp or lens overheats.Beware that you could destroy a very expensive piece of equipment or get electrocuted. The color wheel is very fragile and liable to fall apart just by looking at it. You should not touch the color wheel or any of the optics or DLP IC as it will leave fingerprints and oil. A magnetic screwdriver is highly recommended.
The cost-effective way it so purchase a broken projector off E-Bay with a good color wheel. The wheel can be easily checked because it is visible when the projector lamp is removed. The 6-segments can be visually examined by using a pencil eraser to gently rotate the metal wheel hub so that all segments can be seen. Be extremely careful. DO NOT TOUCH THE COLOR SEGMENTS WITH ANYTHING. The segments are barely attached to the metal hub and can easily be detached accidentally. If the projector only projects in black and white, most likely the color wheel is broken.
Now that the disclaimers and warnings are done, here are the step by step procedures.
Remove the color wheel cable connector
1. Remove screws from bottom of projector. 4 for top, 2 for front and 2 for back covers. Remove 3 screws on the back cover between the RCA connectors.
2. Remove the two lens grips/ring by gently pulling straight out or prying. They are press fit on.
3. One of the hardest parts: Pop off the front cover with several straight blade screw drivers. It's hard to do without marring the projector covers. The bottom can be pried up since the 2 screws are out. The top is held in place with 3 snap-action tabs as shown in the figure. Be careful not to break the cleats (green arrows) nor corresponding tabs (blue arrows) on the top cover.
4. The second hardest part: Pop off the back cover with several straight blade screw drivers. Again, be care not to mar the projector covers. The bottom can be pried up since the 2 screws are out. The top is held in place with 3 snap-action tabs as shown in the figure. Be careful not to break the cleats (green arrows) nor corresponding tabs (blue arrows) on the bottom cover.
5. Remove the top cover. Disconnect 2 connectors to the speaker and buttons. Nothing is holding it down itself for side grooves.
6. Remove power board 6 screws . Disconnect connector to high voltage board. Disconnect green ground screw.
7. Remove high voltage board 4 screws. Disconnect 2 connectors, one to lamp and one to bottom board. Both connectors have ears or clamps that require releasing. Disconnect the black spacer in the center by squeezing the two fingers together.
8. Remove mid plate and clear plastic insulator. You can leave the metal finger shielding (not shown) which attached to the optical IC heat sink. Remove 7 screws and two cable relief lugs to the back connector.
9. Congratulations. You can now see the color wheel cable connected to the bottom board. Disconnect the orange cable carefully from the bottom board. Note that the "connector's" white paper side is pointing toward the fan. Attach a fish tape or wire to the cable so that when you pull it out under the fan, you can fish the new color wheel cable back again.
Remove the Color Wheel
10. We waited to remove the color wheel for last because it is so fragile. To access the color wheel assembly remove 3 screws to remove the optic chamber cover. Do not touch any optics.
The optical path goes from the lamp and lens assembly, through the color wheel, through a small lens assembly, bounces off a mirror, through a large focusing lens, into the IC, and then through the projector lens assembly.
11. Remove the small green PC board on top of the color wheel assembly by removing 1 screw (green arrow). Tape the PC board out of the way so it doesn't accidentally hit your color wheel later. Remove 2 screws (blue arrows, one is hidden by the green PC board) to remove the color wheel assembly.
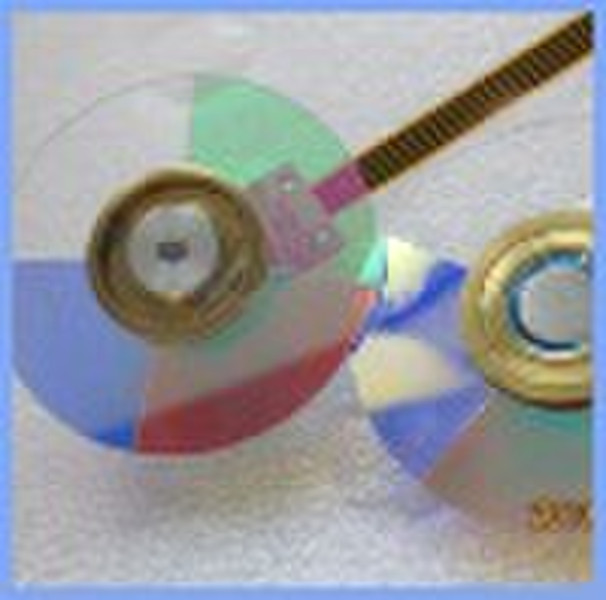
12. Carefully remove the color wheel assembly and carefully remove the color wheel cable from under the fan. It will snag and fight you because there is a label on the cable right under the fan. Be careful so that the fish tape or wire will follow the cable under the fan. See the photo of the color wheel assembly (missing color segments).
Congratulations. You removed the color wheel. Re-assembly is the reverse
Delivery terms and packaging
Packaging Detail: New: A brand-new, unused, unopened, undamaged item in its original packaging (where packaging is applicable). Packaging should be the same as what is found in a retail store, unless the item is handmade or was packaged by the manufacturer in non-retail packaging, such as an unprinted box or plastic bag. See the seller's listing for full details.
Delivery Detail: 3-5 days
Payment term
Documents Against Acceptance
Documents Against Payment
Letter of credit
Telegraphic transfer
MoneyGram
Western Union

-
Payment Methods
We accept: